Utilizing mannequins for your item pictures is a proficient and savvy approach to advance your items.
Mannequins enable your items to hold their shape, which can make item pictures appear to be more expert and steady. Be that as it may, mannequins can be diverting, so an incredible option is to make a ghost mannequin impact for your item pictures, similar to the ones beneath:
At first look, this kind of picture may seem hard to repeat. Like most difficulties, it winds up achievable when you make each stride each one in turn.
Keeping in mind the end goal to make the coveted impact, we will take after a straightforward procedure that comprises of consolidating two pictures of the item. It’s essential to see how you have to photo your items keeping in mind the end goal to influence the after creation to process more powerful.
Take after this straightforward all the way manage and figure out how to utilize after generation picture altering to make a “ghost mannequin impact” in your item pictures.
The most effective method to Photograph Your Products

- Choosing and Posing a Model or Mannequin
A standout amongst the most well-known approaches to photo clothing is by using models or mannequins to exhibit the exceptional shape and attack of every item. Nonetheless, it isn’t generally successful to really demonstrate the model or mannequin in each picture. Retailers at times select to photo their items being displayed and expel the models and mannequins later in Photoshop.
For littler retailers who do the larger part of their picture altering themselves, evacuating models and mannequins can be a troublesome system to ace.
With a specific end goal to make the “ghost mannequin” hallucination, you should first photo your item being worn by a model or a mannequin from numerous points. The in addition to side to this is you will have the capacity to utilize these pictures in your item displays close by any “ghost” pictures that you make.
On the off chance that you choose to utilize a genuine model, make a point to utilize a static posture, as appeared previously. Furthermore, your model ought to be styled negligibly, and long hair ought to be tied up so it doesn’t block review of the item. These points of interest will make picture altering considerably simpler.
The best mannequins are similar and static, as appeared previously. Contingent upon your necessities, you may buy a mannequin with or without arms, hands, legs or neck area. In the event that your mannequin has arms and hands, at that point ensure that the appendages can be situated out of the casing. White matte mannequins have a tendency to be non-intelligent and can be made to mix into white foundations, which will make altering the mannequin out of the picture a substantially less demanding errand.
Ensure that your item fits your mannequin or model by utilizing the correct size or fitting the piece of clothing to fit effectively. Likewise, if your item has sleeves, make a point to position the sleeves descending with the goal that the watcher can’t see down them.
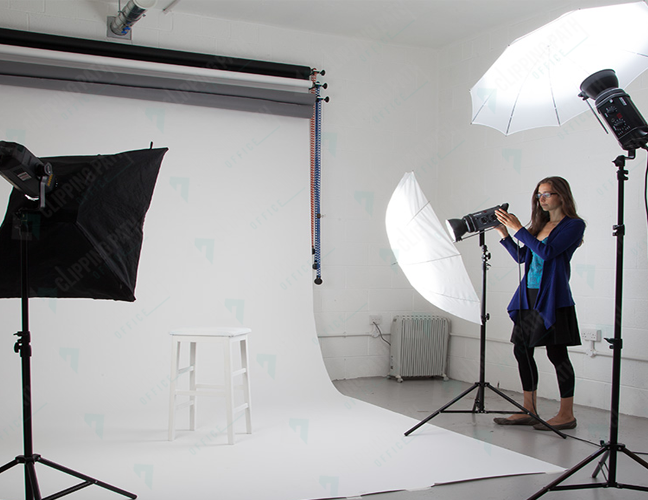
- Setup and Equipment
With a specific end goal to execute the ghost mannequin method, you should have the capacity to make fantastic photos in a studio setting. The lower the nature of your photos, the less interest the ghost mannequin impact will have the capacity to add to those pictures. Camera and lighting methods, gear, and position all become possibly the most important factor here, contingent upon every specific item that you’re shooting.
Read here to find out about how to utilize your DSLR camera’s settings to catch incredible item pictures.
- Capturing the Product
While capturing shirts, it’s vital to position the camera to be specifically level with the chest zone, though the camera ought to be situated opposite the hip region to photo bottoms. Shooting an item from a point that is either too high or too low may make the article of clothing look “decreased” or wrong.
The following are two case photos of a tank top being worn by a mannequin. The picture on the left was taken underneath chest-stature, bringing about an unappealing perspective of the item; the front and back picture on the privilege was taken at chest-tallness, bringing about a complimenting perspective of the item.
Utilizing a fax zoom focal point to catch your pictures can limit contortion and give you the adaptability to draw nearer to littler protests and move more remote far from bigger items. Ensure that your studio shooting space is sufficiently extensive to oblige your camera and tripod, two studio lights and umbrellas dispersed uniformly separated on either side of the item, and setting.
Read here for more thoughts regarding lighting gear and orchestrating a studio space.
To make a 3D picture with the ghost mannequin method, you will first need to catch a front and back perspective of your item being worn by your mannequin or model. From that point onward, you should style and hang your item on a bit of white froth board and photo both the front and back perspectives once more; these froth board shots will enable you to incorporate the inward regions of the piece of clothing once you join the pictures together, as demonstrated as follows.
For captured shirts and comparative items, ensure the best is open and the inward back is plainly obvious. You may even need to hand it back to front over a few examples.
Hi, This is Geetika Bhasin. I am a professional content writer with years of experience in researching, improvising and supplying content to my far-fetched clientele. I am fond of writing articles and stories and when I am not doing so, I will be reading or driving.


