Clipping Path Office

  • HOME
  • ABOUT US
  • OUR SERVICES
    • Clipping Path Service
    • Image Masking Service
    • Photo Retouching Service
    • Photo Manipulation Service
    • Shadow Adding Service
    • Web-Shop Image Editing Service
  • PRICING
  • PORTFOLIO
  • CONTACT US
  • BLOG
FREETRIAL
  • Home
  • Blog
  • Teeth Whitening
  • Teeth Whitening in Photoshop
March 31, 2023

BLOG & Gossip

Teeth Whitening in Photoshop

by Geetika Bhasin / Tuesday, 12 June 2018 / Published in Teeth Whitening, Tutorials

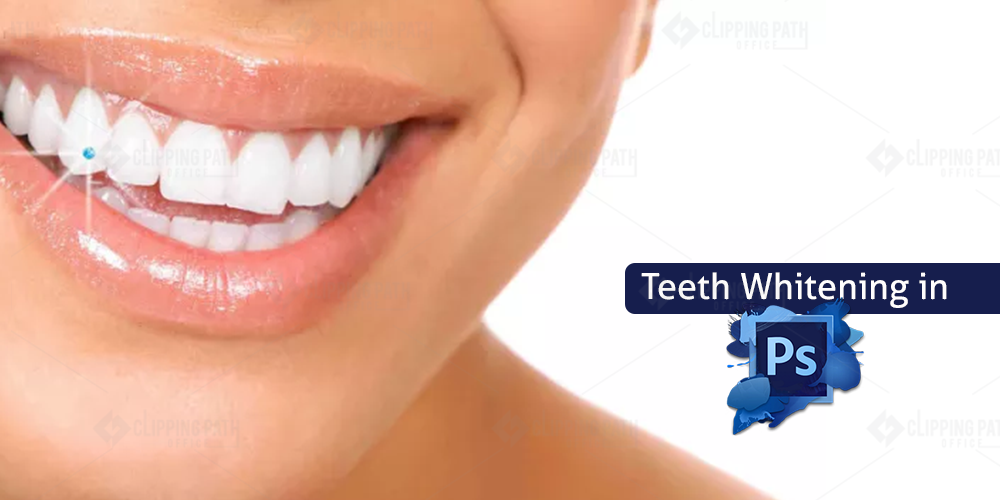
Photoshop is the most widely used software which is in-build with many techniques. You may or may not know this that Photoshop is the best software known for enhancing the looks of the images with many amazing techniques like skin retouching, clipping path, and most importantly is built with many tools that provides convenience to use these techniques. One of the most used technique that is the topic of today’s discussion is the teeth whitening of the model. It is the fact that the happy smile shows the confidence to deal with all problems and also the first requirement of the photographer for capturing the picture of the model is perfect smile on the face of the model but when we talk of the big screen where the image of the model is displayed with the smile and If the teeth of the model is the is not so white then it will look very bad on the big screen. Therefore we have to take the help of the Photoshop for teeth whitening to add this feature to the beauty of the model. There are two ways to do this in the Photoshop and in both ways the quick selection tool works well. The steps for the first way are

First of all select the quick selection tool and make the selection of the teeth and zoom it to have proper view.

Now you have to go to the navigation menu to click at the top

Now select modify and feather.

This will make appear the dialog box from where you can select the feather.

The next step is to choose 2 in the feather radius field to soften the edges of the selection. And then click ok.

To see the image and to have the clear view, select the zoom tool.

You can use the Ctrl +H to hide the selection marquee and this will make the selection marquee invisible

Because the teeth are still selected you have to create the adjustment layer by selecting the hue/saturation button.

This will create the hue/saturation layer in the layer panel and now to select the drop down menu select the yellow.

To remove this yellow, move the slider slowly to the left.

Now you will select the drop down menu and select the master.

Now drag the slider to brighten the teeth to the right and press ctrl + D to make the teeth deselected and ctrl + shift+ E if you want to merge the all the layers into the one.

Here with this step you will find the white teeth. And for second procedure, note down the following steps. These are:

First create the background layer by pressing command+ j.

Now for selecting teeth only use the magic wand tool and press and hold shift key to add entire selection.

Press q as you have to change everything to quick mask.

Now to check the foreground white colour you have to select the brush tool.

Zoom image with space bar to make temporary changes

Now select the area from where you want them to white and then go to the navigational menu and select the image, adjustment /hue saturation. Low the value of saturation to make the teeth white. Change the brightness and press ok after shifting the slider to right.

That’s all about both the ways of teeth whitening!

  • Tweet
  • Share 0
  • Reddit
  • +1
  • Pocket
  • LinkedIn 0
Geetika Bhasin
Geetika Bhasin

Hi, This is Geetika Bhasin. I am a professional content writer with years of experience in researching, improvising and supplying content to my far-fetched clientele. I am fond of writing articles and stories and when I am not doing so, I will be reading or driving.

Related

Tagged under: Easy Ways to Whiten Teeth in Photoshop, How to Whiten Teeth in Photoshop, Teeth Whitening in Photoshop, Whiten And Brighten Teeth In Photoshop, Whiten Teeth Quickly With This Photoshop Elements Tutorial

About Geetika Bhasin

Hi, This is Geetika Bhasin. I am a professional content writer with years of experience in researching, improvising and supplying content to my far-fetched clientele. I am fond of writing articles and stories and when I am not doing so, I will be reading or driving.

What you can read next

Turn Your Photo into Sketch
Learning About Manual Camera Settings
Removing Wrinkles in Photoshop

Leave a Reply Cancel reply

Your email address will not be published. Required fields are marked *

Search

Categories

  • Architecture Designs
  • Background Remove
  • Camera Accessories
  • Camera Settings
  • camera shots
  • Clipping Path/Cut Out Image
  • Color Correction
  • Cosmetic Product Photography
  • Customer’s Point of view
  • Digital World
  • DIY Photography
  • DIY Product Photography
  • E-commerce Product Image Tips
  • E-Commerce Product Photography
  • Edit With Photoshop
  • Fashion Image Editing
  • Freelance Photographer
  • Furniture Photography
  • Ghost Mannequin Photography
  • Growing Business by Onilne
  • Hair Masking Services
  • Image Editing Services
  • Image Manipulation
  • Image Manipulation Service
  • Image masking services
  • Image Optimization
  • Images Editing for Real Estate
  • Images Optimized
  • Improve Post Editing
  • Infographics
  • Infography
  • Neck Joint
  • Non classifié(e)
  • Photo Editing Software
  • Photographer Tips
  • Photography Tips
  • Photoshop Expart
  • Photoshop Tools
  • Portrait Image Editing
  • Product Image Editing
  • Product Photography
  • Product Photography Tips
  • Real Estate Guide
  • Removing Wrinkles
  • Retouching Services
  • Shadow Making
  • Technology
  • Teeth Whitening
  • Tips
  • Tips to buy DSLR
  • Touch Ups
  • Touchups and Editing
  • Tutorials
  • Uncategorized
  • Using clipping path for e-commerce
  • Using Lightroom
  • Watermarking Image
  • Wedding Photo Editing

Recent Posts

  • action camera mount

    Top 7 Budget Action Camera Body Mounts You Can Buy in 2023!

    If you are reading this blog, you must have bou...
  • digital photos

    Tips For Capturing Great Digital Photos

    Perfect images and perfection are no longer ahe...
  • planning photography trips

    Planning A Photography Trip- Check Out These Tips

    A photography trip means the chance in the phot...
  • photographing images

    Facts To Be Considered For Photographing Images

    Learning the art of photography is not the rock...
  • a better photographer

    Help To Become A Better Photographer

    Photography is all about creativity and artistr...

OUR SERVICES

  • Clipping Path /Deep Etch
  • Image Masking Service
  • Photo Retouching Service
  • Shadow Adding Service
  • Photo Manipulation
  • Raster To Vector
  • Web-Shop Image Editing
  • E-Commerce Product Image Tips

USEFUL LINKS

  • Get A Quotation
  • Free Trial
  • FTP Request
  • Contact Us
  • Terms of Service
  • Privacy Policy
  • FAQs

GET IN TOUCH

Phone: +880 1725 414 131
info@clippingpathoffice.com

Clipping Path Office
House: 07 [B1], Road: 05, Sector # 10
Uttara Model Town
Dhaka 1230, Bangladesh.

  • AMEX

SAY HELLO!


    © 2023. Clipping Path Office. All rights reserved.

    Developed By: AR Creative Ltd.

    TOP